AWS CloudTrail configuration is one of the most important elements to understand when you start working with the AWS cloud. So how exactly do you configure AWS CloudTrail? And what are some important things to pay attention to?
How to configure AWS CloudTrail?
5 minut czytania
On the one hand, it may seem obvious. However, I still often encounter the exclusion (or rather an unawareness) of the correct configuration of AWS CloudTrail.
Therefore, in this article, we will take a closer look at what AWS CloudTrail is, why it is so important, and show you how to configure AWS CloudTrail.
What is AWS CloudTrail?
Let’s start from the beginning, what is AWS CloudTrail?
The service is responsible for logging all events on an AWS account. We’re talking about everything that happens when you work with the AWS Management Console, aws cli, AWS SDK and API.
That is, every event such as:
- user1 has logged in to the console,
- Service X performed an action on service Y,
- SecurityGroup has been modified by …,
- Etc.
In short, everything that happens on your account.

The proper care of logs from AWS CloudTrail increases the level of security and helps to meet audit or regulatory requirements.
That is why it is important to take care of this aspect of the configuration so that at any time you will be able to go back in time and check what and how something occurred on your AWS account.
How to enable AWS CloudTrail?
Now let’s briefly explain two very important elements of AWS CloudTrail configuration.
For a long time (although I remember the times when it was not so), for each newly created AWS account, log collection in CloudTrail is automatically enabled.
Uncle Google states that in August 2017, AWS announced that CloudTrail is automatically enabled for everyone (see “New – Amazon Web Services Extends CloudTrail to All AWS Customers“).
So if you create an account now and go to CloudTrail in the Event history panel, you will see logs of what is happening in your account (see graphic above).
Note: This second and very important element… If you look again at the screenshot of the logs above, you will see under the title Event history, there is a very important sentence:
Event history shows you the last 90 days of management events. So your logs are there, but after 90 days they are lost.
Czyli Twoje logi tam są, ale po 90 dniach przepadają. A co w takim razie, gdy przyjdzie nam coś sprawdzać, co wydarzyło się np 180 dni temu? Jak i gdzie można przechowywać te logi dłużej niż 90 dni?
Aby odpowiedzieć na te pytania, postanowiłem napisać ten artykuł. Wciąż i dosyć często spotykam się z sytuacją, w której firmy nie mają wdrożonej konfiguracji bezpiecznego i przede wszystkim dłuższego jak 90 dni przechowywania logów CloudTrail.
So what happens if we have to check something that happened,180 days ago for example? How and where can these logs be stored for more than 90 days?
To answer these questions, I decided to write this article. Because quite often I come across situations where companies do not have a secure, longer than 90 days of storage for CloudTrail log system implemented.
How do you store logs safely?
Now we move on to the essence of this entry, how to securely store AWS CloudTrail logs?
First of all, even if you have only one AWS account, nothing prevents you from saving logs so that they are available for more than 90 days. The idea here is to configure the so-called “Trails” so that the logs are saved to the S3 bucket.
Of course, as usual, I strongly encourage you to create a separate AWS account to store such logs. You can learn why it is worth having multiple AWS accounts, from another of my articles, “Is one AWS account not enough?“
In this post, I will also focus on the secure storage of logs in the multi-account structure. So let’s get into the details.
Organization-wide log storage
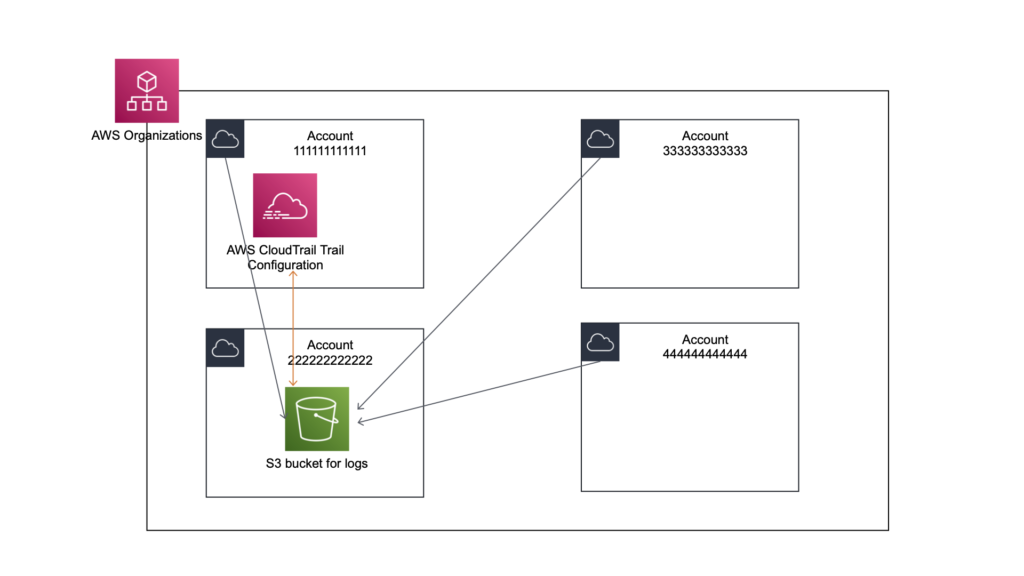
In a situation where you have several AWS accounts, and you also plan to add more in the future, the AWS Organizations service will come to the rescue. Using this, you can not only create and manage accounts but also create a shared configuration for some of the services.
In the organization’s settings, there is a section “Trusted access for AWS services”, where you can “globally” enable services throughout the organization, including AWS CloudTrail.

To implement the “Trails” configuration in such a way that all accounts automatically send logs to the appropriate S3 bucket, make sure that CloudTrail is enabled in your organization (see above).
Where to save CloudTrail logs?
Log in to S3 from multiple AWS accounts.
Now we’re going to set up a secure place to store logs.
If you have already read my article about the multiple accounts, you already know that we will now create an appropriate account, which will be dedicated to storing logs from AWS CloudTrail. So I have a special account in my organization, let’s talk about id 222222222222 (as in the picture above).
Now another important element. Normally, when you create a “Trail” in the account managing the organization (let’s say an account with an id 111111111111), by default you will get proposals to create an S3 bucket on this account.
However, you want the logs to be put away on a dedicated account (id 222222222222), with very limited access. Therefore, before you configure the Organizational Trail, you will first need to create an S3 bucket on the account 222222222222, you will then impose appropriate permissions on it that will allow you to save logs from the entire organization.
Example definition of policy:
{
   "Version":"2012-10-17",
   "Statement":[
      {
         "Sid":"AWSCloudTrailAclCheck20150319",
         "Effect":"Allow",
         "Principal":{
            "Service":[
               "cloudtrail.amazonaws.com"
            ]
         },
         "Action":"s3:GetBucketAcl",
         "Resource":"arn:aws:s3:::gov-my-cloudtrail"
      },
      {
         "Sid":"AWSCloudTrailWrite20150319",
         "Effect":"Allow",
         "Principal":{
            "Service":[
               "cloudtrail.amazonaws.com"
            ]
         },
         "Action":"s3:PutObject",
         "Resource":"arn:aws:s3:::gov-my-cloudtrail/AWSLogs/1111111111/*",
         "Condition":{
            "StringEquals":{
               "s3:x-amz-acl":"bucket-owner-full-control"
            }
         }
      },
      {
         "Sid":"AWSCloudTrailWrite20150319",
         "Effect":"Allow",
         "Principal":{
            "Service":[
               "cloudtrail.amazonaws.com"
            ]
         },
         "Action":"s3:PutObject",
         "Resource":"arn:aws:s3:::gov-my-cloudtrail/AWSLogs/o-YOUR-ORGANIZATIONS-ID/*",
         "Condition":{
            "StringEquals":{
               "s3:x-amz-acl":"bucket-owner-full-control"
            }
         }
      }
   ]
}
An important element for this to work requires you to give your organization the ability (by providing the ID in the place marked in red) to save logs (PutObject operation) to this bucket.
Now go to your 111111111111 management account, then to the CloudTrail service and on the left and select Trails and create a new trail. Then give a name for the trail.
Now the most important part.
- Select “Enable for all accounts in my organization”,
- Select “Use existing S3 bucket” and enter the name of our bucket on logs, e.g. gov-my-cloudtrail.

Other issues such as enscription, validation of logs, I recommend, but I leave it to you. Let’s move on, Next!
Finally, you have the ability to specify what other logs besides “Management events” you want to save and that’s pretty much it.
Now, on every account that you have as well as create in the future, there will be a Trails configuration that will save logs to S3 on a dedicated AWS account.
The advantage of this method is also that such an “organizational” trail cannot be disabled on any associated AWS account. You can be sure that no one will stop saving these logs.

Additional security – Service Control Policy
Since you already use AWS Organizations, you can add additional protection to the logs, that will protect against deletion. For example, In case someone gets into an account with logs with higher than expected permissions.
You can achieve this by imposing an additional Service Control Policy on the account with logs 222222222222, so as to prohibit any modifications or deletion of logs.
{
    "Version": "2012-10-17",
    "Statement": [
        {
            "Sid": "Statement1",
            "Effect": "Deny",
            "Action": [
                "s3:RestoreObject",
                "s3:PutReplicationConfiguration",
                "s3:PutObjectVersionAcl",
                "s3:PutObjectTagging",
                "s3:PutObjectLegalHold",
                "s3:PutObjectAcl",
                "s3:PutLifecycleConfiguration",
                "s3:PutInventoryConfiguration",
                "s3:PutEncryptionConfiguration",
                "s3:PutBucketWebsite",
                "s3:PutBucketVersioning",
                "s3:PutBucketTagging",
                "s3:PutBucketPublicAccessBlock",
                "s3:PutBucketPolicy",
                "s3:PutBucketOwnershipControls",
                "s3:PutBucketObjectLockConfiguration",
                "s3:PutBucketLogging",
                "s3:PutBucketAcl",
                "s3:PutAccountPublicAccessBlock",
                "s3:ObjectOwnerOverrideToBucketOwner",
                "s3:DeleteObjectVersion",
                "s3:DeleteObjectTagging",
                "s3:DeleteObject",
                "s3:DeleteJobTagging",
                "s3:DeleteBucketPolicy",
                "s3:DeleteBucketOwnershipControls",
                "s3:DeleteBucket"
            ],
            "Resource": [
                "arn:aws:s3:::YOUR-BUCKET"
            ]
        }
    ]
}
Of course, this is only an example of a policy that prohibits changes and removes the ability to delete certain logs. Once making these changes to the policy and settings for account 222222222222 it won’t matter who accesses the account they will not be able to delete the logs.
Summary
As you can see, the whole process is quite simple and should not take more than 10-15 minutes of your time to set up. Using multiple accounts allows you to have a dedicated account that looks after a single task that can be safeguarded from deletion as well as the other mentioned advantages, including the ability to export logs externally. Finally, and most importantly it will also give you the ability to keep track of logs way past the standard 90-day expiry period. Cheers!